Static Route
Today I want to show a demonstration on how to configure a static route.
- When we use a static route, a router can learn neighboring network that is not directly connected to one of its own interfaces. Unlike Dynamic Routing, Static Routes are manually added to the routing table via configurations.
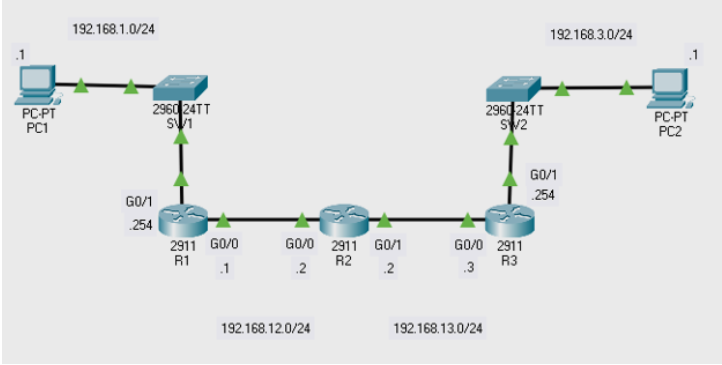
The Goal of this Lab Topology
- Achieve reachability between all the different subnet on the following network
- Can PC 1 ping PC 2? And vice versa?
- I will go through the steps to show you how it’s done
- We will use the Lab Provided below to configure a static route
LAB TOPOLOGY
STEP 1
Configuring PC 1 | 2
Ensure that both PC 1 & 2 have the following configurations applied:
- Ipv4 Address | Subnet Mask | Default Gateway
STEP 2
Configuring Router 1 | 2 | 3
Ensure that all Router’s have the following configurations applied:
- Proper IP address applied to its connected Interfaces (Correct Subnet)
- Port Interfaces all enabled (no shut command)
Router 1
Port Interface : g0/1
IP Address : 192.168.1.254 /24
No Shut command applied to enable port
Router 1
Port Interface: g0/0
IP Address: 192.168.12.1 /24
No Shut command applied to enable port
Router 2
Port Interface: g0/0
IP Address: 192.168.12.2 /24
No Shut command applied to enable port
Router 2
Port Interface: g0/1
IP Address: 192.168.13.2 /24
No Shut command applied to enable port
Router 3
Port Interface: g0/0
IP Address: 192.168.13.3 /24
No Shut command applied to enable port
Router 3
Port Interface: g0/1
IP Address: 192.168.3.254 /24
No Shut command applied to enable port
Once all Interfaces have been assigned IP Address & Interfaces all enabled, you should see the following diagram
- All neighboring port Interfaces should be green
STEP 3
Configuring Static Routes [Router 1 | 2 | 3]
Ensure that all Router’s have the following configurations applied:
- We can finally configure the static route to achieve reachability between all the different subnet
- Command : IP route | Destination IP & Subnet | Next Hop IP Address
- Ensure you set the next hop IP address for both way [PC 1 -> PC 2] [PC 2 -> PC 1]
PC1 Subnet: 192.168.1.0 /24
PC2 Subnet: 192.168.3.0 /24
Router 1 -> Router 2
IP route | Destination IP & Subnet | Next Hop IP Address
ip route 192.168.3.0 255.255.255.0 192.168.12.2
“sh ip route” command for verification
Router 2 -> Router 3
IP route | Destination IP & Subnet | Next Hop IP Address
ip route 192.168.3.0 255.255.255.0 192.168.13.3
“sh ip route” command for verification
Router 3 -> Router 2
IP route | Destination IP & Subnet | Next Hop IP Address
ip route 192.168.1.0 255.255.255.0 192.168.13.2
“sh ip route” command for verification
Router 2 -> Router 1
IP route | Destination IP & Subnet | Next Hop IP Address
ip route 192.168.1.0 255.255.255.0 192.168.12.1
“sh ip route” command for verification
STEP 4
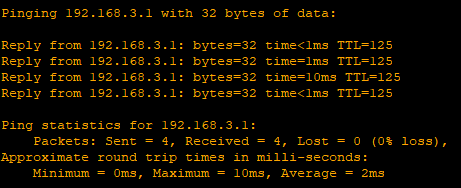
Ping PC once configuration is done
- If all the configuration is properly configured, you would be able to ping one PC to another
PC 1 pinging PC 2
- Receiving reply from PC 2
PC 2 pinging PC 1
- Receiving reply from PC 1
This is how you use static route to achieve reachability between all the different subnet on the following network
- Chris


